
WordPress 是一种广泛使用的内容管理系统(CMS),可让用户轻松创建和管理网站。它与 Apache、MariaDB 或 MySQL 和 PHP 相结合,形成了一个强大的 LAMP 堆栈,是托管动态网站的理想选择。在 Debian 12、11 或 10 上安装 WordPress 需要设置这些组件,使其无缝地协同工作,从而确保可靠、可扩展的虚拟主机环境。
本教程将指导您使用命令行终端在 Debian 12、11 或 10 上安装带有 Apache、MariaDB 或 MySQL 和 PHP 的 WordPress。此外,它还将介绍使用 Let’s Encrypt 创建 SSL 证书的技巧,以确保网站安全,并解决 WordPress 的常见问题,如 HTTPS 重定向循环、PHP 会话错误和域名重定向循环(如果您遇到这些问题)。
安装 Apache - LAMP 堆栈设置的第 1 部分
Apache 2 是一个 Web 服务器,代表 Debian 上 LAMP 堆栈的第一个基本组件。首先使用以下命令安装 Apache 2:
sudo apt install apache2
安装完成后,通过检查Apache版本确认Apache安装成功:
sudo apache2 -v
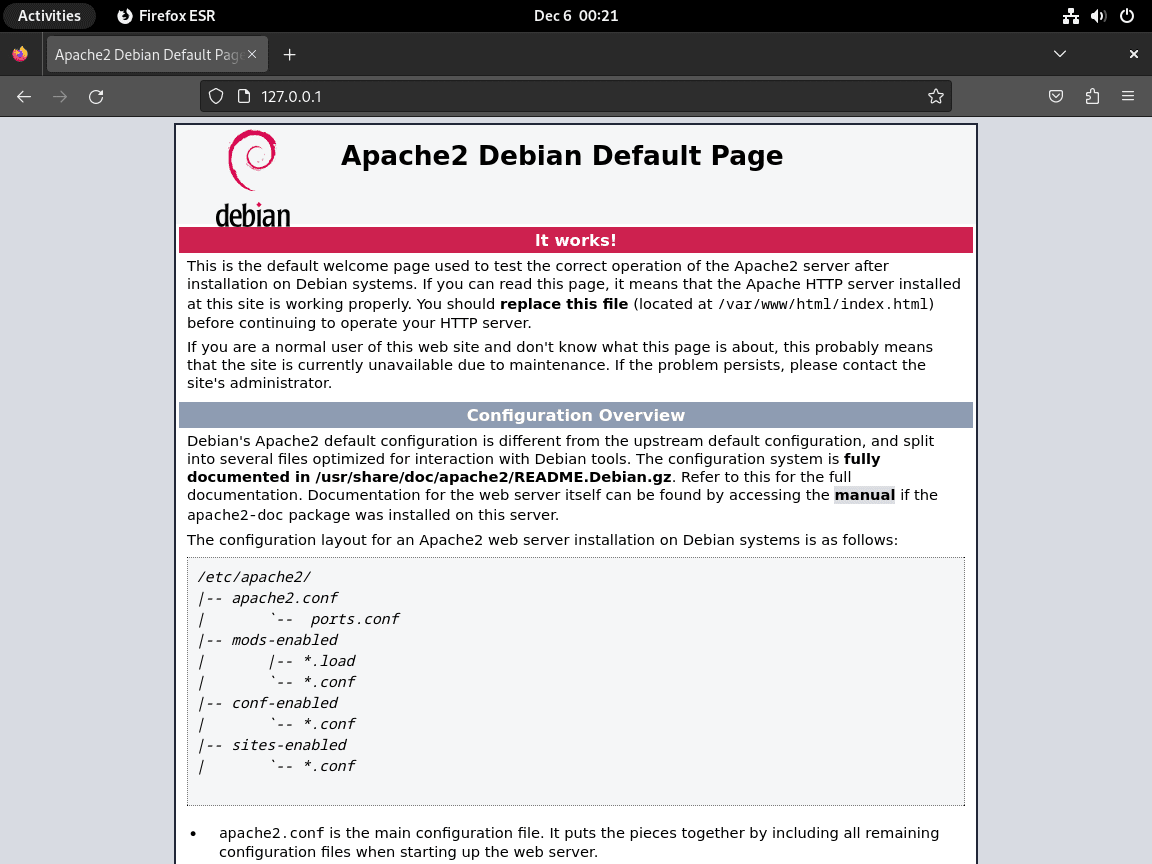
希望得到类似服务器版本的回复: Apache/x.x.x (Debian). 此外,请使用以下命令验证 Apache 的运行状态:
systemctl status apache2

如果 Apache 未处于活动状态,请确保其自动启动并立即激活:
sudo systemctl enable apache2 --now
要测试 Apache 的功能,请在 Web 浏览器中访问服务器的本地 IP 地址,通常为 http://127.0.0.1 或 http://localhost。
http://127.0.01
http://localhost
如果出现访问问题,特别是使用 UFW 防火墙时,请启用 80 端口的 HTTP 流量:
sudo iptables -I INPUT -p tcp --dport 80 -j ACCEPT
该命令调整防火墙规则,允许网络流量通过 80 端口。
安装 MySQL 或 MariaDB - LAMP 堆栈设置的第 2 部分
Debian 的最新版本已从 MySQL 转移到 MariaDB。如果想选择 MySQL,请参阅我们在 Debian 上安装 MySQL 8.0 的教程。对于 MariaDB,尤其是 10.5、10.6 或 10.10、11.4 等较新版本,请使用官方 MariaDB.org APT 存储库遵循我们的 MariaDB 安装教程。
通过 APT 安装 MariaDB
使用 MariaDB 作为 Debian 的默认设置,使用以下命令安装它:
sudo apt install mariadb-server mariadb-client
安装后,验证 MariaDB 的安装:
mariadb --version
检查是否有类似于 mariadb Ver 15.1 Distrib x.x.x-MariaDB 的响应:
mariadb Ver 15.1 Distrib x.x.x-MariaDB, for debian-linux-gnu (x86_64) using readline EditLine wrapper
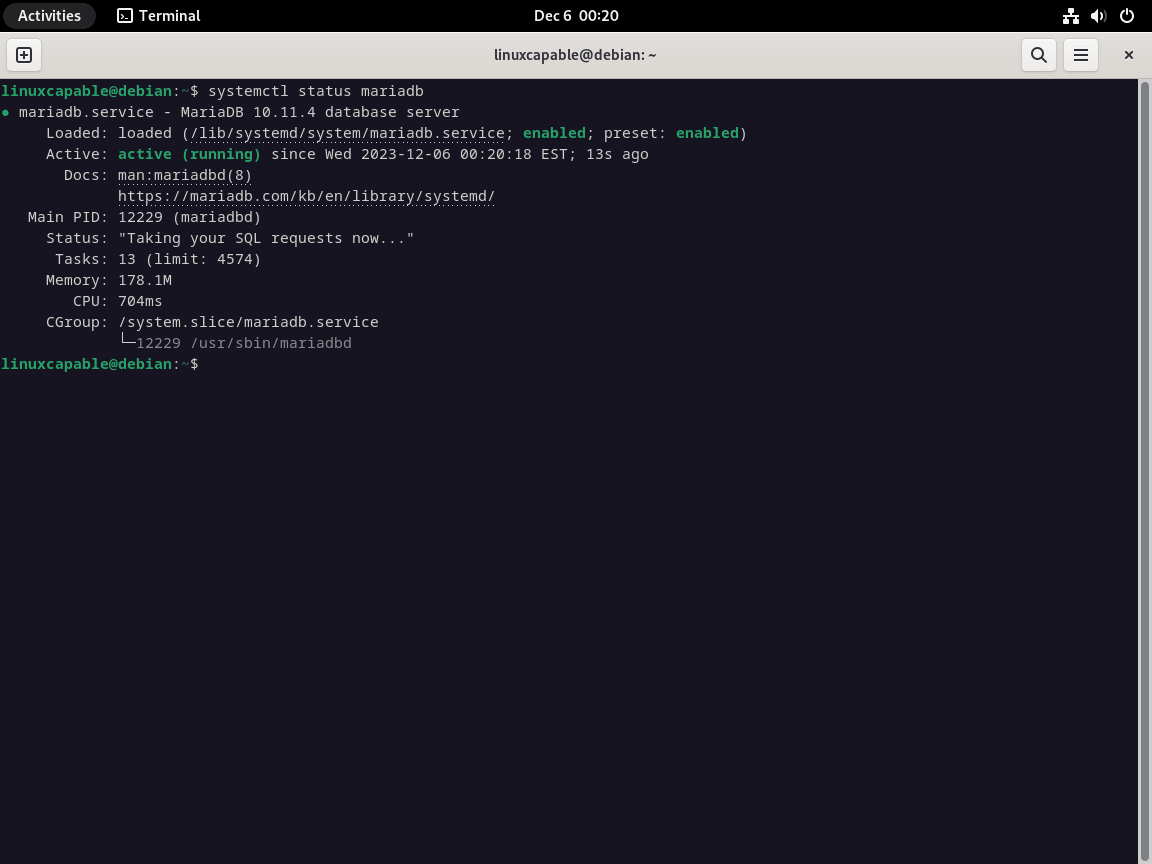
使用以下命令验证 MariaDB 的状态:
systemctl status mariadb
如果 MariaDB 未运行,请启动并设置开机启动:
sudo systemctl enable mariadb --now
浏览基本的 MariaDB 服务命令
对于刚接触 MariaDB 的人,这里有一些基本服务命令的简明指南,这些命令对于在 Debian 服务器上进行高效的 LAMP 堆栈管理至关重要:
停止 MariaDB:
sudo systemctl stop mariadb
启动 MariaDB:
sudo systemctl start mariadb
使 MariaDB 随系统自动启动:
sudo systemctl enable mariadb
禁止 MariaDB 自动启动:
sudo systemctl disable mariadb
重新启动 MariaDB 服务:
sudo systemctl restart mariadb
有了这些命令,就能简化 Debian LAMP 堆栈中 MariaDB 服务的管理。
使用提供的安全脚本保护 MariaDB
新安装的MariaDB默认设置可能并不安全,有可能使系统遭受未经授权的访问或攻击。不过,MariaDB包含一个安全脚本,可以在安装后加强这些设置。
使用以下命令执行mysql_secure_installation脚本,开始增强MariaDB的安全性:
sudo mysql_secure_installation
脚本执行过程中,会遇到各种安全措施的提示:
📚为 root 帐户设置密码。
📚删除可从远程主机访问的 root 帐户。
📚删除匿名用户帐户。
📚放弃匿名用户可访问的默认测试数据库。
通常,建议对这些提示回答 (Y) 以实施建议的安全增强功能。
[joshua@debian ~]$ sudo mariadb-secure-installation

NOTE: RUNNING ALL PARTS OF THIS SCRIPT IS RECOMMENDED FOR ALL MariaDB
      SERVERS IN PRODUCTION USE!  PLEASE READ EACH STEP CAREFULLY!

In order to log into MariaDB to secure it, we'll need the current
password for the root user. If you've just installed MariaDB, and
haven't set the root password yet, you should just press enter here.

Enter current password for root (enter for none):
OK, successfully used password, moving on...

Setting the root password or using the unix_socket ensures that nobody
can log into the MariaDB root user without the proper authorisation.

You already have your root account protected, so you can safely answer 'n'.

Switch to unix_socket authentication [Y/n] Y <---- Type Y then press the ENTER KEY.
Enabled successfully!
Reloading privilege tables..
 ... Success!


You already have your root account protected, so you can safely answer 'n'.

Change the root password? [Y/n] Y <---- Type Y then press the ENTER KEY.
New password:
Re-enter new password:
Password updated successfully!
Reloading privilege tables..
 ... Success!


By default, a MariaDB installation has an anonymous user, allowing anyone
to log into MariaDB without having to have a user account created for
them.  This is intended only for testing, and to make the installation
go a bit smoother.  You should remove them before moving into a
production environment.

Remove anonymous users? [Y/n] Y <---- Type Y then press the ENTER KEY.
 ... Success!

Normally, root should only be allowed to connect from 'localhost'.  This
ensures that someone cannot guess at the root password from the network.

Disallow root login remotely? [Y/n] Y <---- Type Y then press the ENTER KEY.
 ... Success!

By default, MariaDB comes with a database named 'test' that anyone can
access.  This is also intended only for testing, and should be removed
before moving into a production environment.

Remove test database and access to it? [Y/n] Y <---- Type Y then press the ENTER KEY.
 - Dropping test database...
 ... Success!
 - Removing privileges on test database...
 ... Success!

Reloading the privilege tables will ensure that all changes made so far
will take effect immediately.

Reload privilege tables now? [Y/n] Y <---- Type Y then press the ENTER KEY.
 ... Success!

Cleaning up...

All done!  If you've completed all of the above steps, your MariaDB
installation should now be secure.

Thanks for using MariaDB!
安装 PHP – LAMP 堆栈设置的第 3 部分
PHP 充当 Apache 和 MariaDB 之间的中介。 Debian 发行版附带不同的 PHP 版本。对于特定版本或较新版本(例如 PHP 8.x),请参阅我们的 Debian PHP 安装教程。
要使用 Apache 安装 PHP,请执行:
sudo apt install phpx.x libapache2-mod-phpx.x
为更清楚的示例说明,一个典型的 WordPress 扩展安装的具体例子是 Debian 12:
sudo apt install php libapache2-mod-php8.2 php8.2-cli php8.2-common php8.2-zip php8.2-curl php8.2-mysql
注意:Debian 12、11 和 10 有不同的默认版本,除非您根据我们一开始提到的指南安装自定义版本。请记得将 8.2 替换为您使用的任何版本。
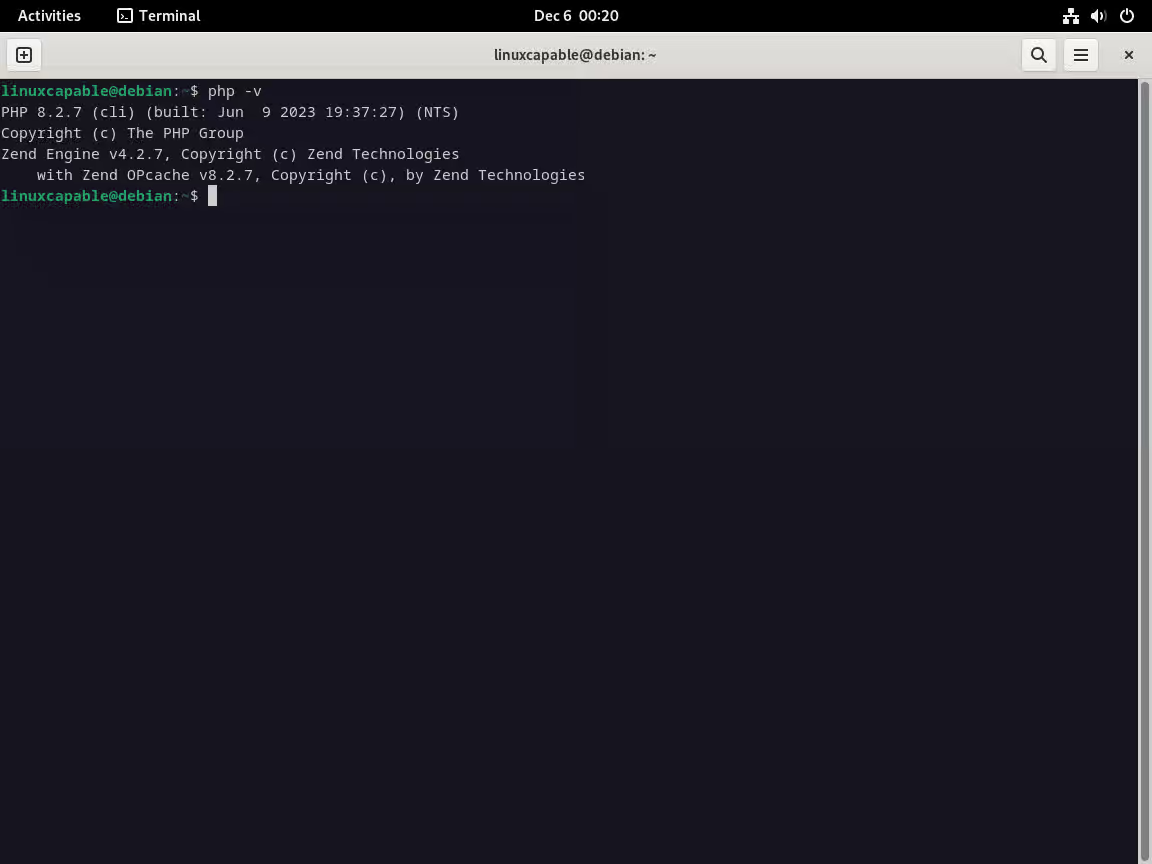
验证您的 PHP 版本:
php -v
安装后,该模块通常会自动加载。但是,如果需要手动加载,请使用以下命令:sudo a2enmod php{version}。
sudo a2enmod php8.2
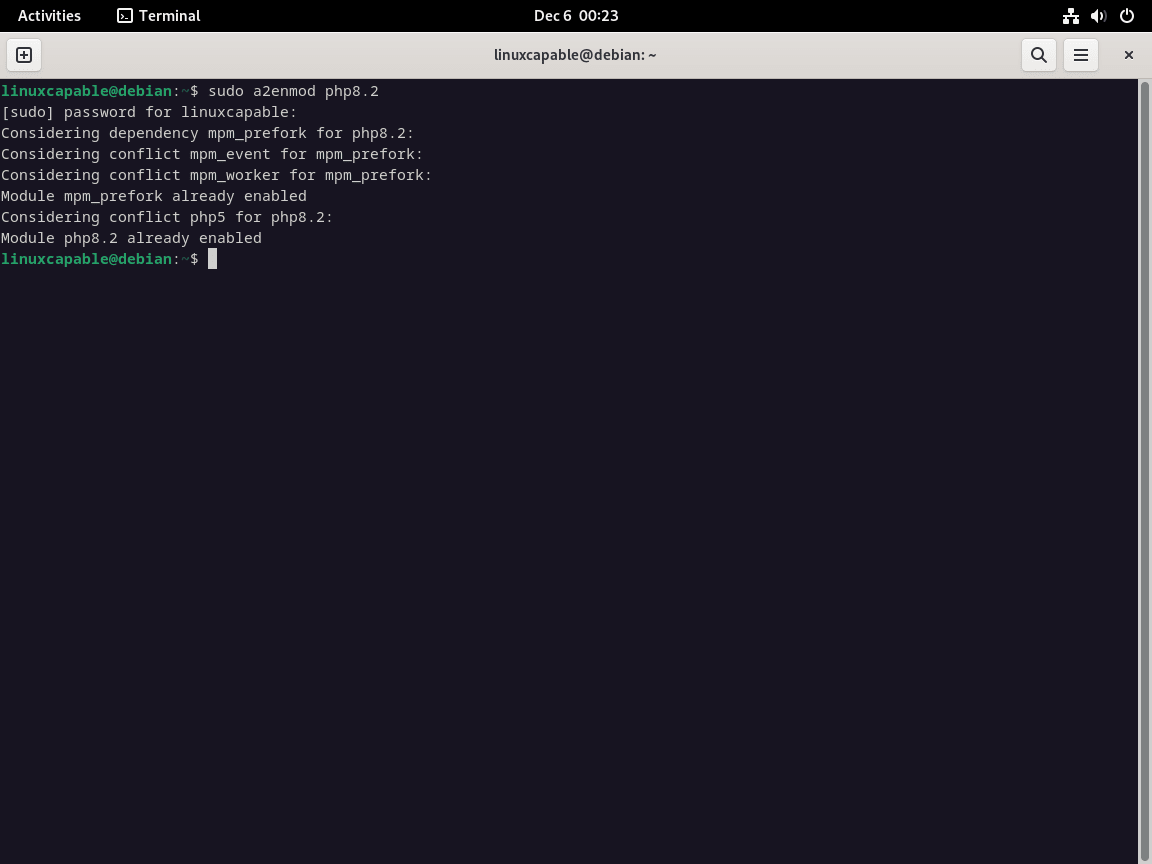
如上所示,模块已经加载。
要完成安装过程,必须重新启动 Apache 服务器以集成 PHP 模块:
sudo systemctl restart apache2
在不同 PHP 版本之间切换时,例如从 8.0 到 8.1,首先禁用当前使用的版本至关重要。要禁用 PHP 8.0,请使用
sudo a2dismod php8.0
然后激活新版本,如 PHP 8.2:
sudo a2enmod php8.2
之后,重新启动 Apache 服务器以应用新的 PHP 模块:
sudo systemctl restart apache2
安装 WordPress 后台
下载 WordPress
首先,您必须下载最新版本的 WordPress,通过 WordPress 提供的以下链接即可快速完成下载:
wget https://wordpress.org/latest.tar.gz
提取 WordPress 目录
sudo tar -xzvf latest.tar.gz -C /data/wwwroot/site1/
⚠️注意:目前国内外几乎所有的教程都把 WordPress 目录放在 /var/www/html/ 下,这里不建议这么做,建议把 WordPress 目录放在 /data/wwwroot/site1/ 下,如果没有这个目录,则先创建目录:mkdir -p /data/wwwroot/site1/
设置权限和所有权
为 WordPress 目录设置正确的权限和所有权至关重要。这将确保网络服务器可以正确访问和修改文件,以便进行更新、插件安装和其他操作。
变更所有权
chown 命令将 WordPress 中所有文件和目录的所有权更改为 Web 服务器用户,通常是 www-data。此步骤对于 WordPress 在服务器上正常运行至关重要:
sudo chown -R www-data:www-data /data/wwwroot/site1/wordpress/
修改权限:
设置正确的权限对于安全性和功能至关重要。 chmod 命令将目录权限设置为 755,文件权限设置为 644。此配置允许 WordPress 安全高效地运行:
sudo find /data/wwwroot/site1/wordpress -type d -exec chmod 755 {} \;
sudo find /data/wwwroot/site1/wordpress -type f -exec chmod 644 {} \;
为 WordPress 创建数据库
WordPress 使用数据库来存储所有站点数据。本部分将指导您使用流行的数据库服务器 MariaDB 为 WordPress 创建新的数据库和用户。
访问 MariaDB Shell:
以 root 用户身份登录 MariaDB。此步骤允许您创建和管理数据库和用户:
sudo mariadb -u root
或者,如果您使用的是 MySQL:
sudo mysql -u root
创建 WordPress 数据库:
执行 SQL 命令创建一个名为 WORDPRESSDB 的新数据库。将 WORDPRESSDB 替换为您所需的数据库名称。该数据库将保存所有 WordPress 数据:
CREATE DATABASE WORDPRESSDB;
创建安全数据库用户:
为了安全起见,请为 WordPress 创建一个唯一的用户。这种做法限制了访问并增强了安全性。将“WPUSER”和“PASSWORD”替换为您选择的用户名和密码:
CREATE USER 'WPUSER'@localhost IDENTIFIED BY 'PASSWORD';
注意:WPUSER 和 PASSWORD 可任意设置。在处理使用 LAMP 安装 WordPress 的数据库问题时,请确保任何下一步的命令都使用了以上的设置。
授予权限:
为新用户分配管理 WordPress 数据库所需的权限。此步骤对于确保 WordPress 可以与其数据库进行交互至关重要:
GRANT ALL PRIVILEGES ON WORDPRESSDB.* TO WPUSER@localhost IDENTIFIED BY 'PASSWORD';
应用更改: 设置用户和权限后,刷新权限以应用更改并退出 MariaDB shell:
FLUSH PRIVILEGES;
EXIT;
配置 WordPress
通过编辑 wp-config.php 文件设置 WordPress 配置。这包括指定数据库详细信息和其他配置。
导航至 WordPress 目录:
切换到 WordPress 安装目录:
cd /data/wwwroot/site1/wordpress/
配置 wp-config.php:
重命名示例配置文件,并对其进行编辑,以包含您的数据库详细信息:
sudo mv wp-config-sample.php wp-config.php
使用文本编辑器打开新重命名的 wp-config.php 文件。在我们的示例中,我们将使用 nano。
sudo nano wp-config.php
使用您的数据库名称、用户和密码更新该文件。您还可以设置数据库字符集和排序规则:
// ** MySQL settings - You can get this info from your web host ** //
/** The name of the database for WordPress */
define( 'DB_NAME', 'WORDPRESSDB' );

/* MySQL database username */
define( 'DB_USER', 'WPUSER' );

/* MySQL database password */
define( 'DB_PASSWORD', 'YOUR PASSWORD' );

/* MySQL hostname, change the IP here if external DB set up */
define( 'DB_HOST', 'localhost' );

/* Database Charset to use in creating database tables. */
define( 'DB_CHARSET', 'utf8' );

/* The Database Collate type. Don't change this if in doubt. */
define( 'DB_COLLATE', '' );
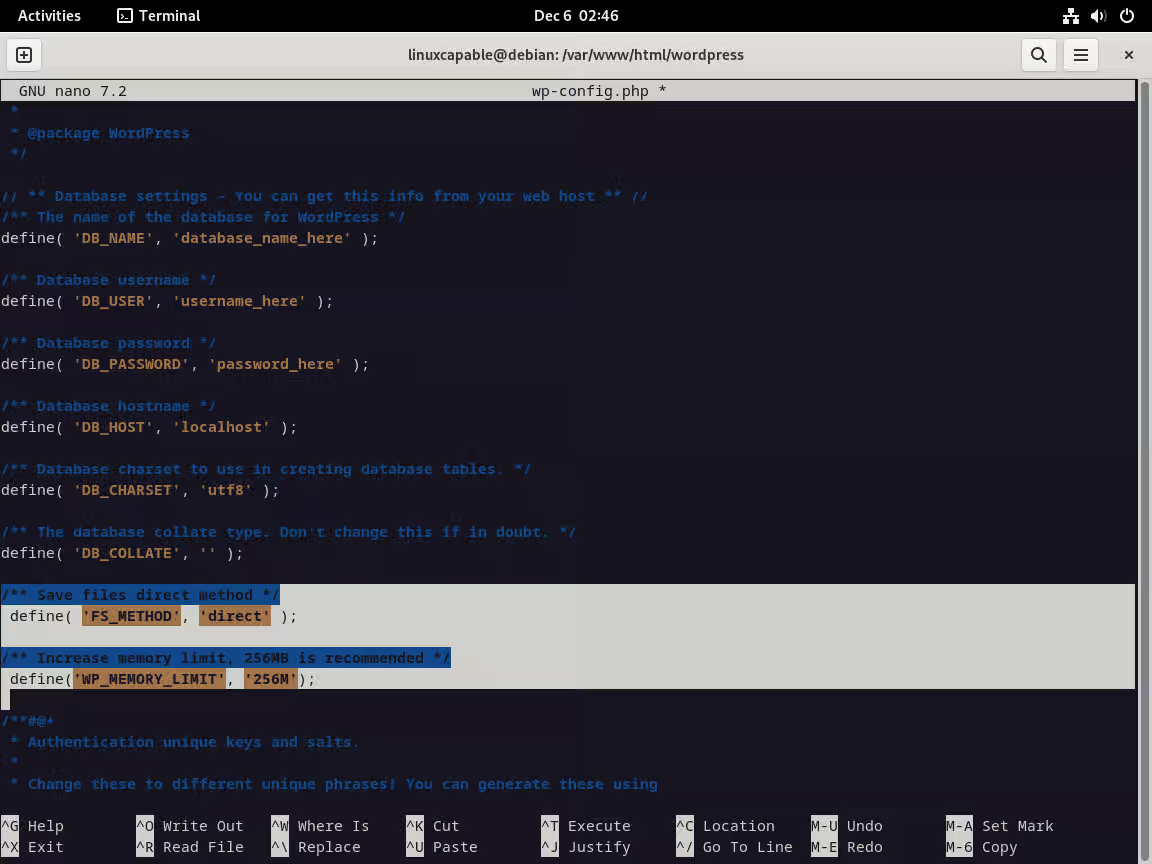
(可选)添加直接文件编辑、内存限制和表前缀的配置:
/* Save files direct method */
 define( 'FS_METHOD', 'direct' );

/* Increase memory limit, 256MB is recommended */
 define('WP_MEMORY_LIMIT', '256M');

/* change Wordpress database table prefix if wanted */
 $table_prefix = 'wp_';
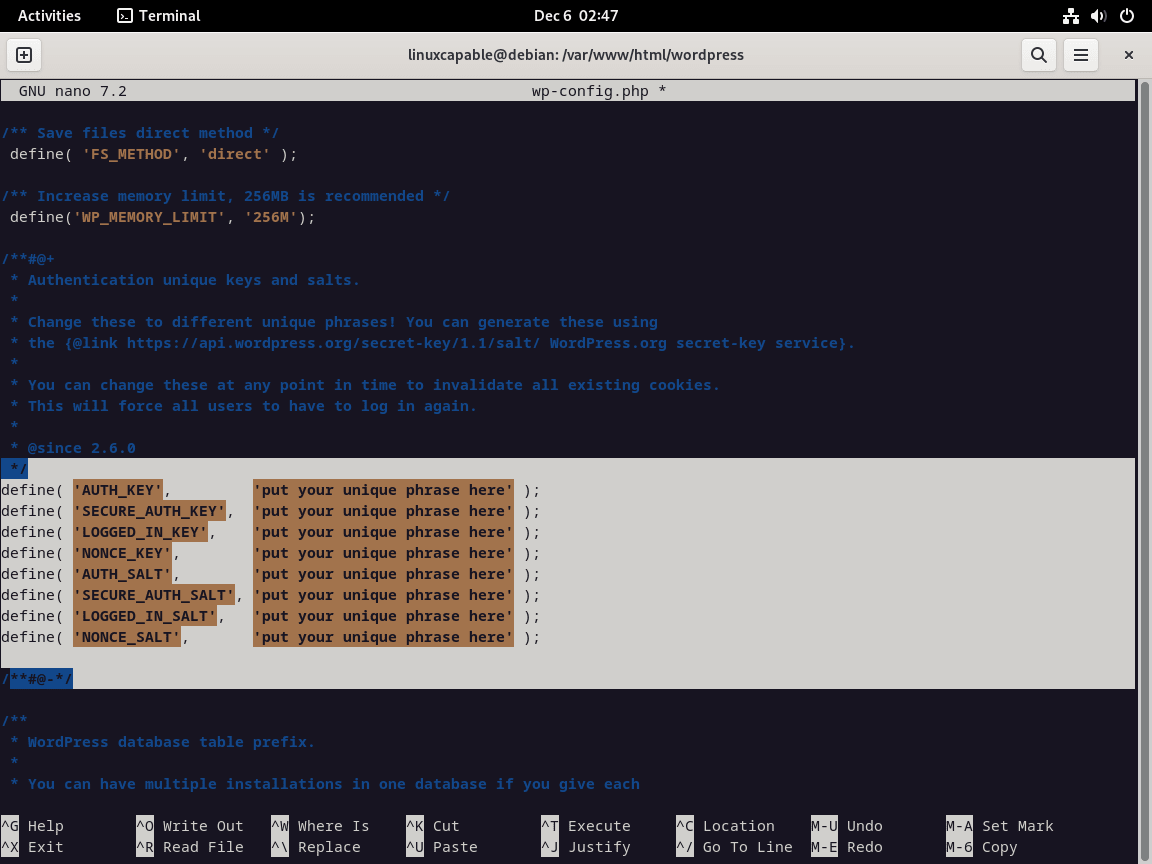
设置 WordPress 安全密钥
为 WordPress 生成唯一的验证密钥。访问 WordPress 秘钥 API,用生成的密钥替换 wp-config.php 文件中的占位符行。
为 WordPress 配置 Apache
在 Apache 中为 WordPress 网站设置虚拟主机。这一步对于将网络流量导向您的 WordPress 安装目录至关重要。
创建虚拟主机文件:
为您的 WordPress 站点创建一个新的配置文件:
sudo nano /etc/apache2/sites-available/example.com.conf
使用您的域、文档根目录和必要的指令配置文件:
<VirtualHost *:80>
    ServerName yourdomain.com
    ServerAlias www.yourdomain.com
    DocumentRoot /data/wwwroot/site1/wordpress
    <Directory "/data/wwwroot/site1/wordpress">
        AllowOverride All
    </Directory>
    ErrorLog ${APACHE_LOG_DIR}/wordpress.error.log
    CustomLog ${APACHE_LOG_DIR}/wordpress.access.log combined
</VirtualHost>
接下来,使用以下命令对虚拟主机进行一次干测试。
sudo apache2ctl configtest
输出示例:
Syntax OK
如上所述,虚拟主机配置没有错误,因此现在可以启用虚拟主机。
sudo a2ensite example.com.conf
最后,重新启动 Apache 服务。
sudo systemctl restart apache2
安装 WordPress 前端
访问安装地址
要启动 WordPress 安装,请在浏览器中输入您网站的域名。使用以下任一 URL:
https://www.yoursite.com
https://www.yoursite.com/wp-admin/install.php
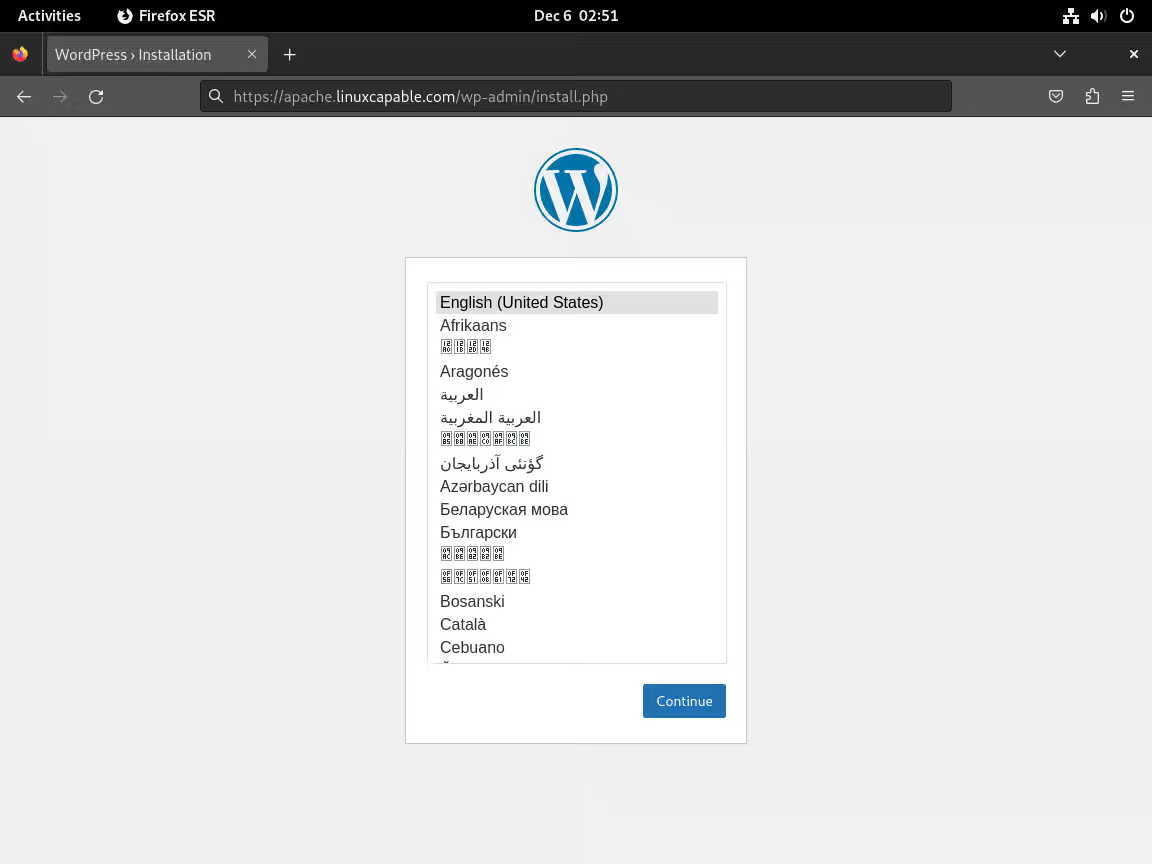
访问该网站后,您将看到语言设置页面。在这里,您可以选择 WordPress 安装的首选语言。
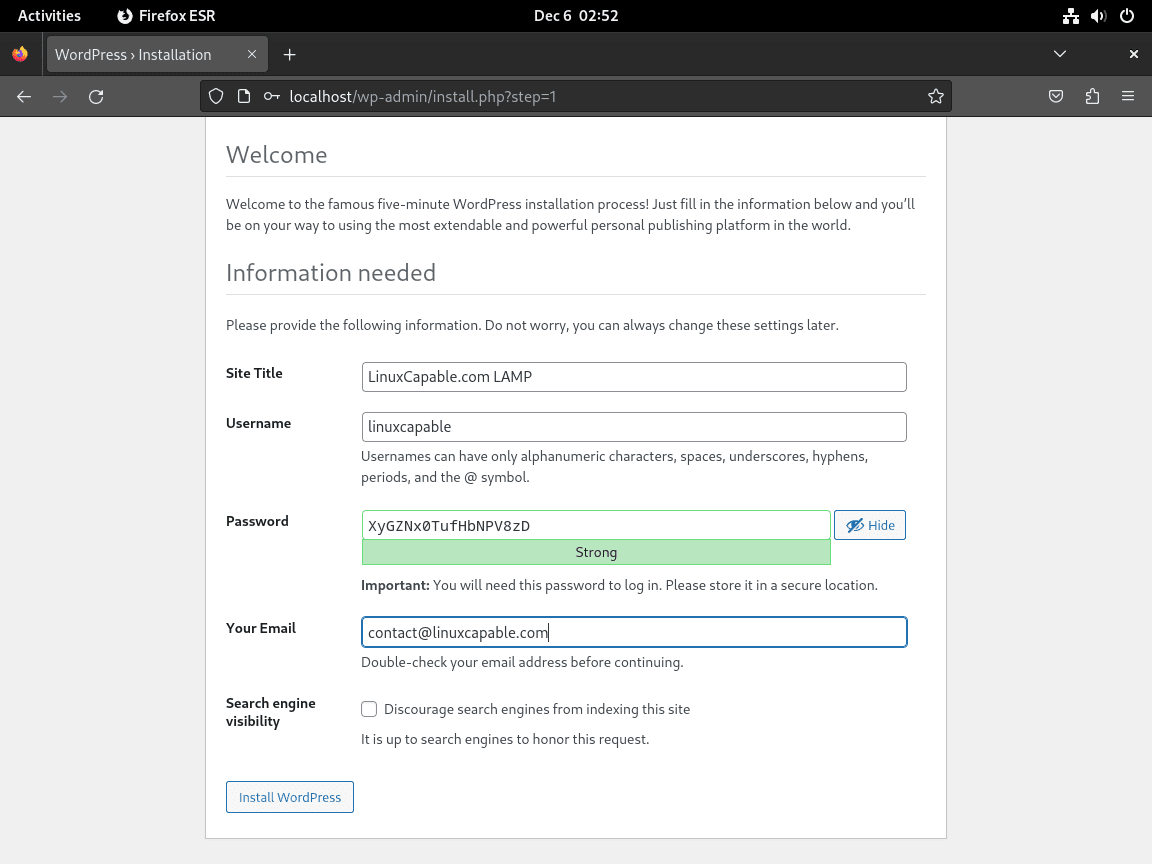
设置管理员帐户
下一步涉及创建您的管理员帐户。这是至关重要的一步,因为它设置您的用户名和密码,您将在以后登录时使用它们。请记住,这些凭据随时可以更改。
配置搜索引擎可见性
对于正在建设中的网站,建议阻止搜索引擎对您的网站建立索引。在设置过程中选择“强烈阻止搜索引擎索引此网站”选项。此步骤可确保 Google 和 Bing 等搜索引擎不会将您的未完成 (WIP) 网站编入索引。一旦您的网站可供公众查看,您就可以更改此设置。
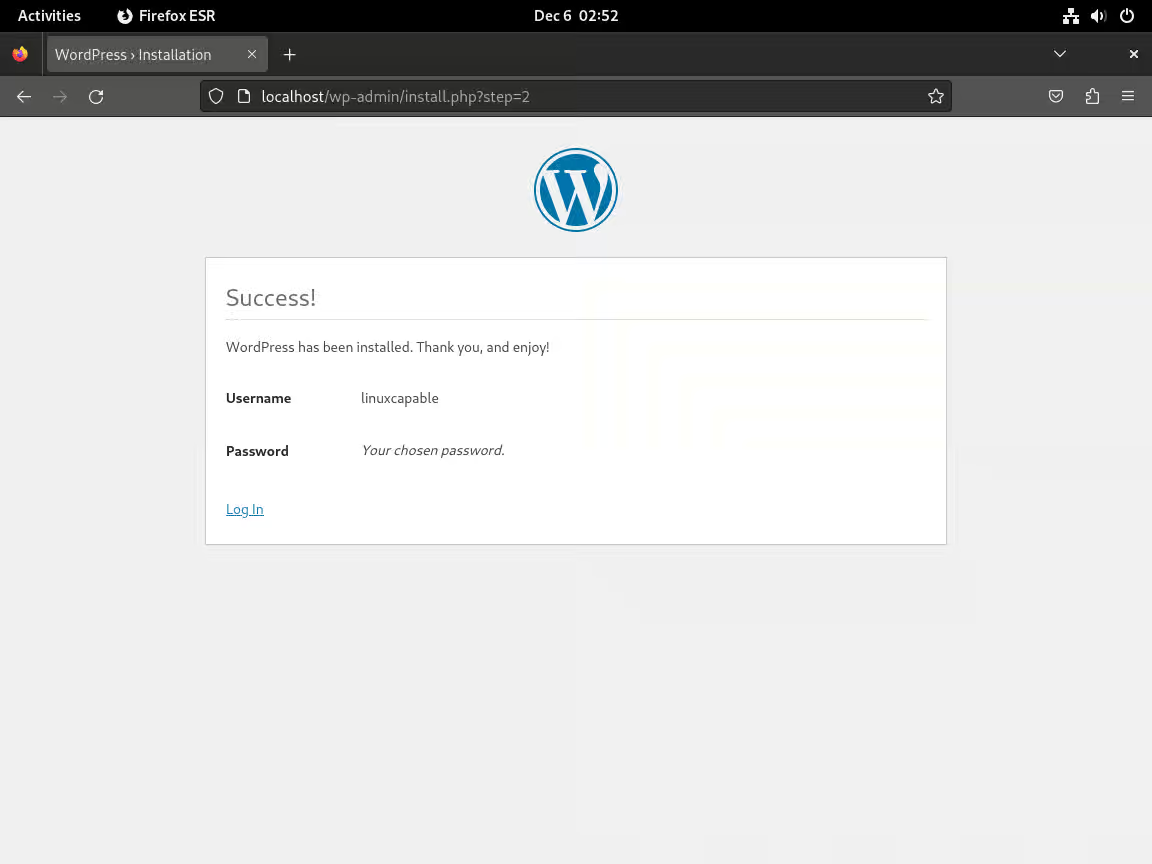
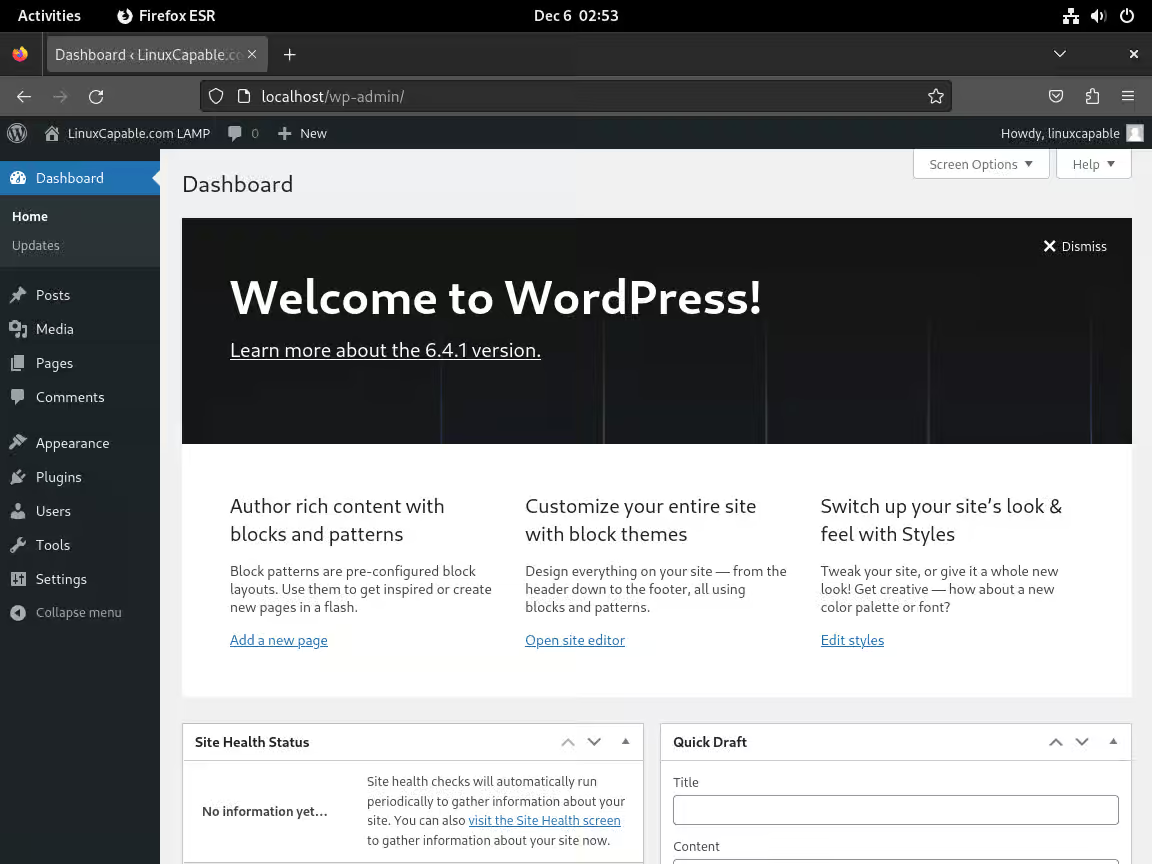
完成 WordPress 安装
完成这些步骤并登录后,您由 Debian 上的 LAMP Stack 提供支持的 WordPress 网站就已成功安装,并可进行定制和内容创建。
创建 Let’s Encrypt SSL 免费证书
为了增强 Debian 的安全性,在安装 WordPress Apache 时使用 Let’s Encrypt SSL 证书至关重要。Let’s Encrypt 是互联网安全研究小组(ISRG)的一个免费自动证书颁发机构。它通过启用 HTTPS(一种通过计算机网络进行安全通信的协议)来提高网站的可信度。
安装 Certbot 以集成 SSL
使用 Let’s Encrypt 保护网站安全的第一步是安装 Certbot。Certbot 是一种自动获取和安装 SSL 证书的软件工具。使用以下命令安装 Certbot:
sudo apt install python3-certbot-apache -y
生成 SSL 证书
安装 Certbot 后,使用以下命令生成 SSL 证书:
sudo certbot --apache --agree-tos --redirect --hsts --staple-ocsp --email [email protected] -d www.example.com
使用您的电子邮件和自定义域名 [email protected] 和 www.example.com。此步骤通过 HTTPS 重定向、Strict-Transport-Security 标头和 OCSP Stapling 确保网站安全,从而增强安全性。
SSL证书自动续订
Let’s Encrypt 证书的有效期为 90 天。要自动更新,请设置 cron 作业。使用以下命令编辑 crontab 文件:
sudo crontab -e
添加此行以安排每日检查更新:
0 3 * * * /usr/bin/certbot renew --quiet
此命令每天凌晨 3 点检查更新情况,并在需要时悄悄更新证书。
过渡到 HTTPS
完成这些配置后,您的网站将使用 HTTPS,将所有 HTTP 流量重定向到安全的 HTTPS 连接。这将确保服务器和用户浏览器之间的数据加密。
为 LAMP 堆栈设置 UFW 防火墙
在 LAMP 堆栈中使用 Apache 时,配置简易防火墙(UFW)非常重要。UFW 简化了防火墙管理,对控制服务器服务的访问至关重要。
安装 UFW
如果尚未安装 UFW,请使用以下命令添加它:
sudo apt install ufw -y
启用 UFW 在系统启动时启动:
sudo ufw enable
在 UFW 中配置 Apache 配置文件
Apache 与 UFW 集成并提供了多个配置文件。要列出这些,请使用:
sudo ufw app list
输出会显示 “Apache”(HTTP)、”Apache Secure”(HTTPS)和 “Apache Full”(HTTP 和 HTTPS)等配置文件。请根据您的设置进行选择。
启用 UFW 配置文件
要进行不带 SSL 的基本设置,请启用 Apache 配置文件:
sudo ufw allow 'Apache'
对于 HTTPS 流量(设置 SSL 后),启用“Apache Secure”:
sudo ufw allow 'Apache Secure'
要同时允许 HTTP 和 HTTPS,请使用:
sudo ufw allow 'Apache Full'
解决 WordPress 常见问题
解决 PHP 会话错误
使用特定 WordPress 插件时经常会遇到 PHP 会话错误,这通常是由于 /var/lib/php/sessions/ 目录中的权限不正确造成的。
使用以下命令可有效解决这一问题:
sudo chown -R www-data:www-data /var/lib/php/sessions/
该命令将 sessions 目录的所有权更改为 www-data 用户和组。这样,WordPress 就获得了写入会话数据的必要权限,这对于处理社交媒体集成等自动化任务的插件来说至关重要。纠正 PHP 会话错误可提高网站性能和用户体验。
在 WordPress 中解决 HTTPS 重定向循环问题
WordPress 中的 HTTPS 重定向循环通常发生在启用 HTTPS 之后,可以通过编辑 wp-config.php 文件来修复。当 WordPress 不断重定向到 HTTPS,但过程从未完成时,就会出现这种循环。
修改 wp-config.php 文件
要解决这个问题,请在 wp-config.php 中插入以下几行:
define('FORCE_SSL_ADMIN', true);

if (strpos($_SERVER['HTTP_X_FORWARDED_PROTO'], 'https') !== false) {
    $_SERVER['HTTPS'] = 'on';
}
代码解释:
📚FORCE_SSL_ADMIN 行确保所有管理页面都使用 HTTPS。
📚随后的代码会检查 HTTP_X_FORWARDED_PROTO 头中是否有 “https”。检测到后,它会将 HTTPS 服务器变量设置为 “on”,表示安全连接。
实施这些更改后,HTTPS 重定向循环问题就会迎刃而解,从而确保 WordPress 网站通过安全连接顺利运行。
修复域名重定向循环
WordPress 中的重定向循环可能是由于 wp-config.php 文件中的域名与网站的实际域名不一致造成的。
验证 wp-config.php 文件
检查并调整 wp-config.php 中的域名:
define('WP_HOME','http://example.com');
define('WP_SITEURL','http://example.com');
确保此处的域名与网站的实际域名一致。如果域名设置正确,问题仍然存在,则可能是服务器配置造成的。在这种情况下,建议您联系托管服务提供商寻求帮助。
总结
按照本教程,您已经在 Debian 12、11 或 10 上成功安装了带有 Apache、MariaDB 或 MySQL 和 PHP 的 WordPress。现在,您的 WordPress 网站已安装在强大的 LAMP 堆栈中,可确保最佳性能和可靠性。此外,您的网站还获得了 Let’s Encrypt 的 SSL 证书,增强了网站的安全性和可信度。
在继续管理 WordPress 网站的过程中,请注意解决 HTTPS 重定向循环、PHP 会话错误和域名重定向循环等常见问题。定期更新软件组件和 WordPress 插件对于维护安全性和性能至关重要。如需持续维护或排除故障,请参阅本指南或查阅其他资源,以确保网站平稳安全地运行。
Welcome to our website